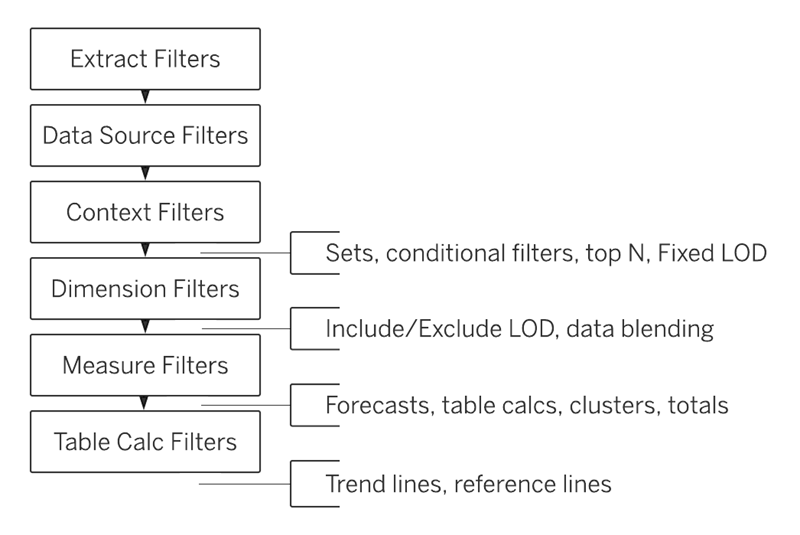
I am a big fan of Level of Detail (LOD) calculations. But, I will admit that I often rely on creating FIXED LODs. Often this is because I want to make sure the calculation is always treated the same way regardless of the worksheet that uses the calculation. However, there are times when using an INCLUDE or EXCLUDE LOD makes more sense, especially if you want to have the level of detail calculation occur after dimension filters, sets, conditional filters, top N or fixed LODs.
This week’s WorkoutWednesday @HipsterVizNinja challenged us to leave our comfort zone of the FIXED LOD and use INCLUDE to calculate the quantity by manufacturer for each sub-category and show the average. The user must select a subcategory from which a comparison of quantities is derived, with a second axis showing the variance for the selected subcategory vs. all other subcategories.
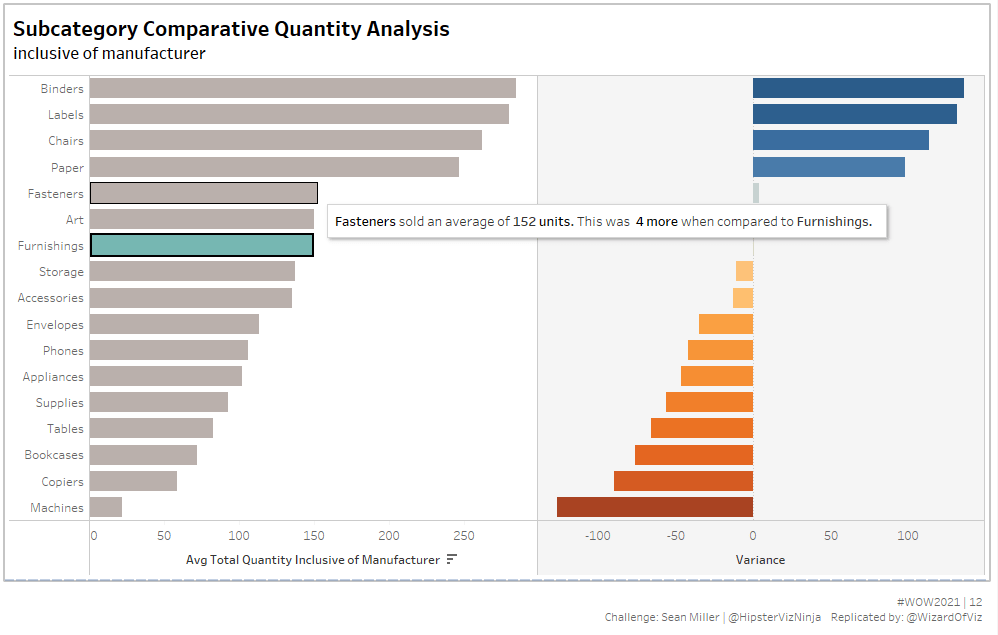
The view is made up of two axes: one showing the Average Total Quantity Inclusive of Manufacture and one showing Variance compared to a selected subcategory.
Calculate Avg. Total Quantity Inclusive of Manufacturer
When using level of detail, the INCLUDE function uses the current level of granularity (in this case subcategory) and adds an additional dimension (or multiple dimensions) to the granularity for the calculation. In this case, we want to calculate the total quantity for each manufacturer and subcategory, and then visualize the average by manufacturer.
Avg. Total Quantity Inclusive of Manufacturer
AVG({INCLUDE [Manufacturer]: SUM([Quantity])})
Select Subcategory
When interacting the visual, the user needs to be able to select a subcategory for comparison. Use the subcategory dimension to create a parameter. Create a boolean calculation comparing the parameter value to the subcategory dimension.
Selected SubCategory
[Sub-Category Parameter]=[Sub-Category]
Additionally, create a calculation that pulls out the quantity for the selected parameter.
Selected Quantity
WINDOW_MAX(AVG({INCLUDE [Manufacturer]: SUM(IF [Selected SubCategory] THEN [Quantity] END)}))
Use the same logic for the Avg. Total Quanitity Inclusive of Manufacture, but include an if statement to pull out only where for the selected subcategory from the parameter. Use the WINDOW_MAX function to return the max of all these values (the values will be either null or the quantity for the selected subcategory) such that each subcategory will return the same value regardless of the subcategory.
Calculate Variance
The second axis of the graph shows the variance between the avg quantity for each subcategory and the avg quantity for the selected subcategory.
Variance
[Total Quantity Inclusive of Manufacturer]-[Selected Quantity]
Those subcategories with more quantity will have positive variance; those less than the selected quantity will be negative.
Create view
To build the view, add subcategory to rows, and Total Quantity Inclusive of Manufacturer and Variance on columns. Since Variance uses WINDOW_MAX (a table calculation), you must set the scope and direction for the calculation. Set the calculation to compute using Table Down (based on each subcategory). Each measure will have its own marks card, in addition to a marks card for All. For the Total Quantity Inclusive of Manufacturer, use the Selected Subcategory on Color, where the True value is to Light Teal (the selected subcategory) and the False value is set to Light Grey (all other subcategories). On the Variance marks card, drag a copy of Variance (from columns) to Color, preserving the scope/direction of the table calculation.
Create Dashboard and Add Interactivity
Bring the view onto the dashboard, sized as 1000 px by 650 px. We need to add two dashboard actions to this view:
- Change Parameter
- Highlight
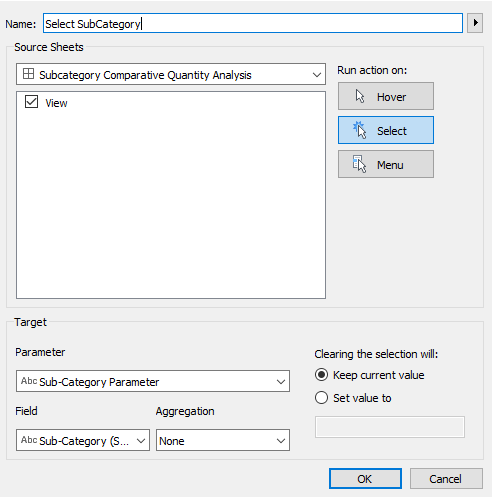
Create an action to change the parameter based on selecting a subcategory.
When selecting a subcategory, the bar will be highlighted by default. We can “remove” the highlight by creating a dummy highlight that will highlight all bars, thereby making it look like nothing is being highlighted. Create a field for the dummy highlight. I just set this field equal to ‘1’. Add this new field to detail on the All marks card. Create a highlight action passing through only the highlight field when you select on the view.
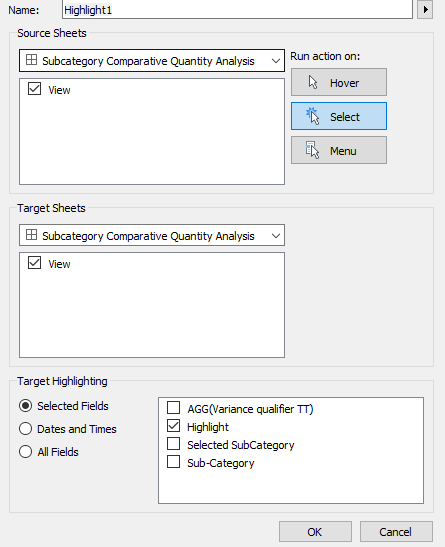
Since all marks contain the highlight value, all will be highlighted and therefore it appears as if none are highlighted.
Create tooltip
The tooltip requires a few calculations to display as desired. Create a calculation for the absolute value of the Variance, and a corresponding calculation that based on if the variance is positive or negative, assign text of more or less.
Variance (TT)
ABS([Total Quantity Inclusive of Manufacturer]-[Selected Quantity])
Variance Qualifier (TT)
IF [Variance]>0 THEN ‘more’ ELSEIF [Variance]<=0 THEN ‘less’ END
Bring both of these new calculations to the tooltip and create the text to align. Since these calculations are based off Variance, a table calculation, you must also set the scope/direction for these fields. Adjust the compute using to be based off both the Sub-Category and Selected Sub-Category for both of these calculations.

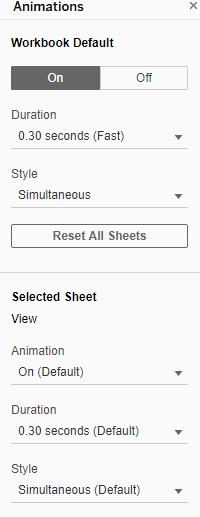
Add Animations
With version 2020.1, Tableau added animations. These animations can be turned on or off for each workbook or each view and animate any changes to the visualizations. To turn on animations, access the animations options from the Format –> Animations menu. From here, you can turn on the default for the entire workbook, the speed of the animations, and the style (either sequential or simultaneous). You can also change the settings for each selected sheet independently.
Upon selecting a subcategory bar, the visualization will use animations to show the change from the prior state to the new state.
Summary
This visualization provides a valuable method for comparing any dimension member against others with a slick user interface. I can see many uses for my retail customers to allow for easy analysis across any categorical data. The parameter actions make the selection and resulting changes to the view seamless, and when coupled with animations allow for easier comprehension of how the data changes with each selection. Revisiting the topic of LOD calculations, could we have used a FIXED LOD? Yes. However, since our view already contained one of our dimensions needed for our calculation, using the INCLUDE function just makes sense. If we used that calculation on a different view that did not already have subcategory on it, our resultant values would be different.
Side Note:
For those of you still terrified of LODs…Tableau has been thinking of you. In the upcoming 2021.1 release, Tableau is introducing Quick LODs, allowing users to drag and drop a measure on a dimension to create the LOD calculation.
